White Bean Cassoulet & Cornbread

Posted on
I’m gearing up this week to fly out to Chicago, and then D.C., for a super fun weekend with two of my best, oldest friends.  So I haven’t had much time the past week or two for writing…although that’s not to say I haven’t been cooking!  In fact, a new special friend and I have just started cooking together recently, and last night he happened to come over on one of my days off, which means I got to consciously do my grocery shopping with a meal half-in-mind.

It also means I got to pick up this little gem of an artichoke, which was on sale and from California!  I’ve never cooked an artichoke before, but Alice Waters made it sound pretty easy, so we ate it as the after-dinner course, dipped in butter melted with garlic and thyme, and a few toasted slices of this week’s bread: jalapeno cheese.

It’s been awhile since I’ve made cornbread, and I had the perfect little end nub of a jalapeno left to add just the right amount of zing to it.  Alice Waters is my guide for anything simple-bakey, like cornbread or pancakes.


This is a super quick one to whip up, simply stirring together all of the following in a mixing bowl: 

  • 3/4 cup finely ground cornmeal
  • 1 cup flour
  • 1 tablespoon baking powder
  • 1 tablespoon sugar
  • 2 teaspoons salt


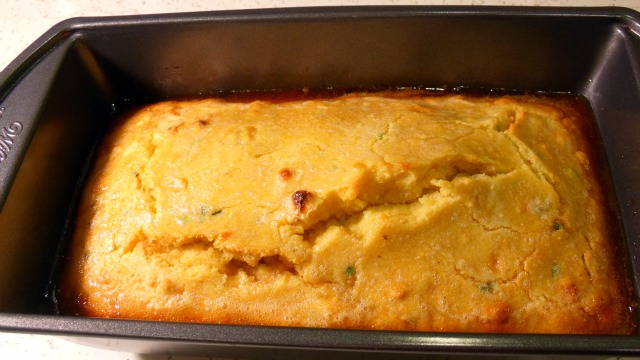
Once that’s mixed, stir in 1 egg, 1 cup of milk, 1/4 of a fresh jalepeno (diced), and 4 tablespoons melted butter.  Pour the batter into a loaf pan or pyrex, and bake at 450 for 20-25 minutes.


I actually like to bake the cornbread until it’s almost done, and then ten minutes before taking it out, melt a little pot of butter, honey, and salt together (use my single-serving Turkish coffee pot, perfect for melting stovetop and then pouring), and drizzle it over the top and let it caramelize during the last ten minutes of baking.

And for the evening’s main event, I made a white bean cassoulet.  Maybe it’s not totally fair to call it a cassoulet, because I think the crowning feature of that dish is the baked breadcrumb topping, which this was conspicuously lacking, but all the other elements were there.  

I started some white beans soaking this morning, and cooked them for about half an hour while I chopped all my veggies, to soften them up.  I had bought an Italian sausage at New Seasons for the occasion, which I froze for an hour or two before I started cooking so that I could slice it into perfect little thin discs more easily.
I started by cooking the sausage in the big pan I was planning on using, then setting them aside but leaving the grease in the pan to use in sauteeing the following: 1 diced shallot, 2 carrots and 4 stalks of celery, both cut in pretty big chunks, a bay leaf, and some chopped fresh thyme.


After about 15 minutes I added the sausage, the cooked white beans (which initially began as 1/2 cup of dried beans), and about 3/4 of a large can of plum tomatoes, which I broke apart with my hands and added with the sauce they came in.  
Then I added a few inches of water, and about a tablespoon of vegetarian Better Than Bullion (I think the real-deal chicken stock here would have been a little too rich, with the sausage and all), kept it on medium-high heat, and let it all reduce down for about half an hour.


Super delicious, and enough left over for both our lunches!


Valentine’s Day

Posted on
So a few of my friends and I have a little tradition of doing V-Day ladies’ night every year, which usually entails getting dressed up and going out to a fancy dinner at restaurants I wouldn’t normally find myself at.

But this year, due to some vegan constraints (or faux vegan, we later found out), we decided to do dinner in, so I suddenly found myself hosting a Valentine’s Day dinner party for 7.

So with my only constraints being meat-and-dairy-free, and complementary to the pasta salad and ginger beet soup that Kate and Helene were bringing (yeah, it was a lot of beets.  But it’s Valentine’s Day!  And winter in Oregon!), here’s what I came up with as a supplementary menu:

  • Bruschetta with homemade baguettes
  • Salad of mixed greens, roasted beets, and coconut-candied walnuts with Dijon shallot dressing
  • Marinated eggplant
In case you haven’t noticed, I am fond of making entire meals out of combinations of appetizers.

The bruschetta recipe is one of my favorites, and I was so stoked because I usually don’t get to whip this one out until summer barbecue time, but for some reason the tomatoes at New Seasons keep being from California, so I’m kind of going nuts with them.

Start by mincing 4 garlic cloves and throw it in a mixing bowl with 1 teaspoon coarse salt, some red pepper flakes, and the juice of an entire lemon.

Then, chiffonade 15 large basil leaves, and chop 3 medium tomatoes.

Add these to the bowl and pulverize them with a potato masher, then add 2 teaspoons white sugar, and 1/3 cup balsamic vinegar.

Let this all marinade together for an hour or so, and then add 2 more finely diced tomatoes and a glug or two of olive oil.  I could have diced these more finely, but this bruschetta tastes so good I always just end up eating it with a spoon anyway, so I’m not so concerned with its steadiness on a cracker.
I find that by the time this is ready to serve, it’s way more liquidy than I like.  Fortunately, it’s delicious liquid, so at this point I strain out all the excess juice, and set it aside for a future incarnation as salad dressing.
Then, the baguettes.  This is a super simple recipe, and astonishingly fast.  I’m used to baking bread that takes 4-5 hours in total, all said and done, with multiple risings.  Not this one — you can go from initial mixing to out-of-the-oven in just over two hours.  The key is a ton of yeast.

Start by mixing 5 teaspoons yeast with half a cup of lukewarm water, and letting it activate for 5 minutes.  Add 1.5 teaspoons salt and 4 cups of flour, and slowly incorporate more water until you have a nice, doughy consistency, kneading for 5-10 additional minutes.  Return it to the bowl, cover it, and let it rise for 1 hour.

Divide the dough into two portions, and roll them out into long tubes.  I start in the middle and massage the dough, rolling while I press down with my hands and move out towards the ends, stretching and smoothing the dough at the same time.

Once you’re happy with the length, place them on the baking sheet you’ll be using, make those diagonal scores you always see on baguettes, and let them sit for about 20 more minutes.  Meanwhile, preheat your oven to 400 degrees.

The key to baguettes is they’ll be baking at a very high temperature, for a very long time (1 hour!).  That’s how you get the outside crusty and the inside chewy.  But, to prevent the crust from burning, you need to remove them every 15 minutes and baste them with cold water.  

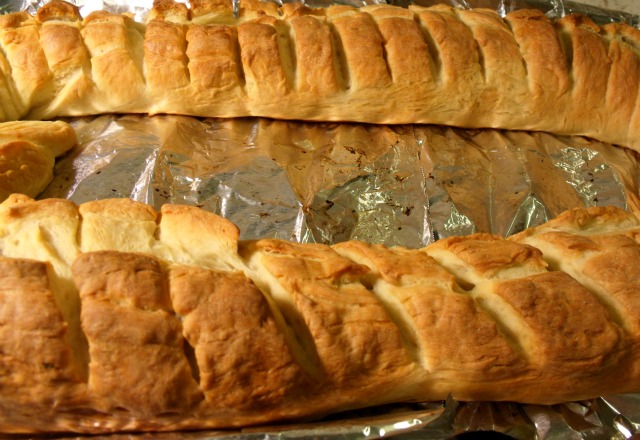
By the way, I like to do really deep scores; that way you don’t have to deal with all the shrapnel that comes from slicing baguettes; you can just tear each piece off as you go. 


I know, right?!

Now, the eggplant.  This is another Smitten Kitchen-inspired recipe, and a super easy one to toss together for a dinner party or potluck.
Start by slicing 2 medium size eggplants to 1/4-inch thickness.  Arrange them on a baking sheet, brush the tops with olive oil, and broil for 3-4 minutes per side.

Meanwhile, mix together 2 tablespoons red wine vinegar, 2 tablespoons small capers, 1/4 cup chopped fresh herbs like mint or parsley, 1/4 teaspoon salt, some cracked pepper, and 3 tablespoons olive oil.  As the batches of eggplant come out of the oven (although I have TWO ovens, with independent temperatures, I for some reason only have one baking sheet, so this dish inevitably comes in rounds for me), let them cool and add them to this marinade, gently mixing.

And then finally, the salad.  This only forethought this required was to start a large beet roasting while I prepared everything else, wrapping it in foil and tossing it in a 400-degree oven for an hour, then unwrapping it and letting it cool.  
At this point, the skin will slide off easily in your fingers and the only slicing I had to do was to cut the beet into little half-circles and add it to a bed of mixed greens.
Candied walnuts are always a welcome addition to any salad, but remember, vegan!  Instead of candying the nuts in my usual go-to of butter and brown sugar, I instead melted together some coconut oil, agave syrup, cinnamon, and a bit of salt, and then threw the walnuts in, browning them until just before they were about to burn.

And the dressing?  Well this is where we welcome back the strained juice from the bruschetta.  There was an entire mason jar’s worth of liquid left over, so I later whipped up a larger batch of this and am keeping it in the fridge as a ready-to-go homemade dressing.  
But for this salad I used about a quarter of the liquid, and added to it: 1 minced shallot, a spoonful of Dijon mustard, salt, pepper, a pinch of fennel seeds, and some nutritional yeast (I can’t help it!  It makes every dressing better).  Yum.

Happy Valentine’s Day!


How to Bake Homemade Bread

Posted on
So you may have heard me allude to the fact that I bake bread every week as part of my day off routine.  This has become a regular habit of mine for nearly three years now, and though I love me a good slice of Dave’s Killer Bread every now and then when I’m out to brunch or over at friends’ houses, I actually haven’t bought a commercial loaf of bread since February of 2008.

This is partly motivated by thrift (I think I calculated once that even factoring in the ingredients I use to spruce up my breads, like sunflower seeds, sundried tomatoes, cloves of garlic, etc.), the cost of production of a homemade loaf comes out somewhere in the range of 50 cents, and always lasts me the whole week — sometimes even longer in which case it is destined for croutons and bread crumbs.  But that’s another story, to be told another time.

So here we go.  I usually get this started on my Monday mornings, which are usually reserved for laundry, dishes, cleaning up the house from the past week, and writing my Yarnia newsletters and blog posts for the coming week.  Step one is easy: I mix 3 teaspoons of yeast (I know, this is probably the only time you’ll ever see me using measurements!) with 1 teaspoon of sugar, and 1.5 cups of warm-ish water, and let that all hang out for about five minutes — just enough time to start a load of laundry and put some clothes on so I don’t find myself still in my pajamas at 2:00 p.m.; if it doesn’t happen early, it doesn’t happen at all.

This activates the yeast, so I’ve heard.  I’ll be honest, I don’t actually know a lot about the science of bread.  I’ve just tried this approximately 156 times and have figured out what works.


After five minutes is up, add 1.5 cups of white flour to the bowl, and mix it all together.  The consistency will be thick enough to give some resistance to your stirring, but definitely would not be called dough yet.

This gets the yeast really working, and at this point you just leave it sitting there for 30 minutes.  By the time you come back, you’ll see that the mixture is already bubbling, and has even started to rise.

Half an hour — not quite long enough to really settle into a big project, but perfect for drinking some coffee, responding to emails, straightening up, and contemplating what kind of bread this is really going to be.

Because the next step is where you really decide what kind of personality this bread is going to have.  Once your half hour is up, you’ll add to the bowl 2 teaspoons of salt, 2 tablespoons of sugar, and…whatever else you want.  Here are some of my favorite combos to throw in at this point:
  • roasted cloves of garlic and chopped red onion
  • 1/2 cup raw oats and 2 tablespoons of honey
  • fresh basil and sundried tomatoes
  • fresh jalapenos and 1/2 cup shredded sharp cheddar
  • 1 tablespoon of nigella
  • 1 cup rye flour and 1 tablespoon whole caraway seeds
  • chopped black olives and fresh oregano
  • 1/2 cup chopped walnuts, 1 teaspoon cinnamon, and a handful of raisins
  • 1/2 cup cranberries and 1/2 cup orange juice (this one you have to think ahead for — substitute the orange juice for 1/2 cup of the water at the very beginning.  Try this with buttermilk too, instead of the O.J.!)
…you get what I mean.  What kind of bread do you want?  Here’s where you make it happen.  Toss whatever you’re thinking about into the bowl, and now it’s time to add the flour and really make this into a dough.

I like to use some whole wheat flour, but not too much, or else the bread will be too dense and heavy.  I usually go with about a 1 to 1.5 cups of whole wheat flour (or rye, or spelt, or raw oats, or kamut, or whatever else…I even used cooked potatoes once to make potato cracked pepper bread!), and the rest being white.

Here’s where it’s going to get vague.  So with all this in the bowl, and your supplemental flour on top, start mixing it all together with your hands.  They’re going to be dirty and sticky from hereon out, so make sure you’ve turned off whatever’s boiling on the stove, put your hair up, taken the lid off the flour jar, and turned your favorite podcast on before digging in.

This isn’t the kneading part yet, just mixing it all together with your hands, and adding little handfuls of flour as you go, incorporating it in until this mess starts to form something of a ball, and gets less and less sticky.

At some point, you’ll be able to actually take this ball out of the bowl because it will have an actual shape to it that you can grab.  At this point you’re getting closer, but still need to add more flour.  I toss the flour handful-by-handful onto my clean counter space and just start kneading the ball into the flour pile until it’s all eaten up, and then reassess the stickiness.

Once you’re at the point where the dough isn’t sticking to your hands anymore, and is even pulling the old sticky dough off your fingers, you’re ready to start the real kneading.  

I hear 10 minutes is a good knead time, but I just like to count.  Once this dough really feels like dough, I give it about 50-60 more “kneads” and then call it a day.


Put it back in the bowl you were mixing everything in, cover it with a towel, crank the heat if you live in a basement suite like I do, and set your timer for 2 hours.  This is where bread gets easy.  You can do whatever you want with the next two hours — read a book, get some work done, go for a run, even leave the house and do errands!  If you get carried away and overshoot the 2 hours, no biggie.  You’re just going to punch the bread down and let it rise again anyway.


After 2 hours your dough will look something like this.  You’ll be so proud of your yeast!  It’s actually doing its job.  And now you’re going to undo all its hard work.  Because you’re going to take that big beautiful puffy bowl of dough, dump it back on the counter, and smoosh all the air out of it.  The longer, slower, and more times you let your bread rise, the more flavor it will develop, so this second rising is key.  It’s discouraging the first time, but just have faith that it will rise again.  Yeast are pretty determined like that.


I’m not sure why or how I originally interpreted the words “punching down” to mean what I’m about to tell you, but for some reason I did, and it works, so I go with it.  I take that big puffy ball and start from one end, rolling it up like a sleeping bag at your fifth grade slumber party.  It will look kind of like a lame croissant.


Then, turn it 90 degrees and start at the narrow end you’ve just created, turning it back into more of a ball shape.  Are there any folds or creases showing?  Use your hands to pull the dough over these creases and towards the bottom side of the ball, so that it looks smooth and all the creases are sealed up.  (Feel how easy and elastic it is?  Your dough is changing consistency from the rising!)  Roll it around on the counter a few times to make sure it’s a sealed-up ball, and then it’s time for the second rising.


This is where you need to decide whether you want to make a loaf or a round.  If you’re making a loaf, put the dough in a loaf pan (coated with olive oil, if you want) for this second rising; if you’re making a round, just rest it on whatever baking sheet you’ll be putting in the oven.

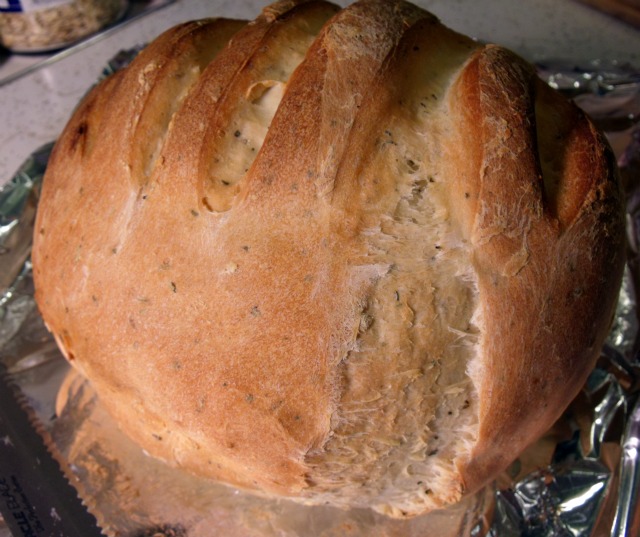
I like to score my bread before the second rising, so that it rises in whatever direction I tell it to: making a plus sign at the top of a round will make it expand in all directions; a slit down the middle when in a loaf pan will help it to fill out width-wise, and a bunch of horizontal slashes just makes it look kind of cool and rustic.


Let it rise again for another hour or so, or however long it takes for it to look like the size of a loaf of bread, and then bake it in the oven at 350 degrees for 35 minutes.  Take it out and see if you can resist for 15 minutes while it cools; this is when I then eat the heel with a good amount of homemade butter and enjoy the rest of my day in a house filled with the aroma of fresh baked bread!